


Box2D C++ tutorials - Top-down car physics
Last edited: March 19 2014
Halt! You should have a good understanding of
the basic tutorials before venturing further.
Top-down car physics
The discussion of how 'top down' car physics might be implemented in Box2D comes up fairly often, so I thought I would give it a try and make a topic for it. Usually a top-down car is modelled in a zero-gravity world, represented by one body for the chassis and four separate bodies for the wheels. Depending on how realistic a simulation is required it might be good enough to just use one body for the chassis and not worry about having separate wheels.
In either case the crux of the problem is preventing a body from moving in one local axis (tire should not slide sideways) while still allowing it to move freely in the other local axis (tire should be able move back and forwards). This in itself is not such a difficult feat, but the trick is getting it to feel nice for the user when they control the car. If the lateral velocity is simply killed completely the car will feel like it's on rails, and we might actually want to allow the car to skid in some situations, and behave differently on various surfaces etc. Before we get started you might like to take a look at Doug Koellmer's excellent implementation of top-down cars in Flash: qb2DemoReel.swf (click the 'Next demo' button a couple of times). This is the kind of thing we're aiming for.
The basic procedure is to find the current lateral velocity of a body and apply an impulse that will cancel out that velocity. We will start with just one body to represent a tire, and later attach four of these to another body for a more complex simulation. Since all the tires do the same thing we can make a class for them. Here is the starting point, a class which has a b2Body pointer as a member variable and sets it up with a simple box shape.
1 2 3 4 5 6 7 8 9 10 11 12 13 14 15 16 17 18 19 20 | class TDTire { public: b2Body* m_body; TDTire(b2World* world) { b2BodyDef bodyDef; bodyDef.type = b2_dynamicBody; m_body = world->CreateBody(&bodyDef); b2PolygonShape polygonShape; polygonShape.SetAsBox( 0.5f, 1.25f ); m_body->CreateFixture(&polygonShape, 1);//shape, density m_body->SetUserData( this ); } ~TDTire() { m_body->GetWorld()->DestroyBody(m_body); } }; |
Killing lateral velocity
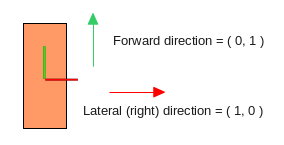
To cancel out the lateral velocity we first need to know what it is. We can find it by projecting the current velocity of the body onto the current normal vector for the 'sideways' direction of the tire. Let's say that in the local coordinates of the tire (0,1) will be forwards and (1,0) will be rightwards. We can use GetWorldVector on these to get the current orientation of these directions in world coordinates.
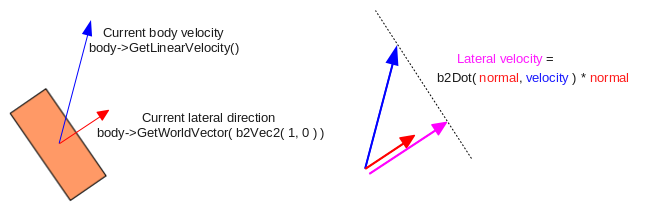
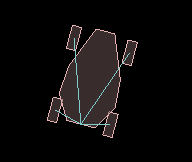
 For example suppose the tire is rotated a little, and moving upwards as shown in the
next diagram. We want to 'project' the blue vector onto the red one to see how
long it would be if it was only going in the red vector's direction.
For example suppose the tire is rotated a little, and moving upwards as shown in the
next diagram. We want to 'project' the blue vector onto the red one to see how
long it would be if it was only going in the red vector's direction.
 So we can add a function like this to the tire class:
1 2 3 4 | b2Vec2 getLateralVelocity() { b2Vec2 currentRightNormal = m_body->GetWorldVector( b2Vec2(1,0) ); return b2Dot( currentRightNormal, m_body->GetLinearVelocity() ) * currentRightNormal; } |
1 2 3 4 | void updateFriction() { b2Vec2 impulse = m_body->GetMass() * -getLateralVelocity(); m_body->ApplyLinearImpulse( impulse, m_body->GetWorldCenter() ); } |
You will also see that it is still free to rotate around it's center as much as it likes which is a little unrealistic. A real car tire doesn't really do that, so let's kill the angular velocity in a similar way to the lateral velocity. Rotations are a little easier because we don't have to do that vector projection stuff - add this to the updateFriction function:
1 | m_body->ApplyAngularImpulse( 0.1f * m_body->GetInertia() * -m_body->GetAngularVelocity() ); |
Finally, you may have noticed that the tire is able to roll on forever in its 'forward' direction, so let's apply a drag force to make it roll to a stop eventually.
1 2 3 4 | b2Vec2 currentForwardNormal = getForwardVelocity(); float currentForwardSpeed = currentForwardNormal.Normalize(); float dragForceMagnitude = -2 * currentForwardSpeed; m_body->ApplyForce( dragForceMagnitude * currentForwardNormal, m_body->GetWorldCenter() ); |
Controlling a tire
Before we get to making a car with four tires, we need to take care of a few more things that a single tire should do. We will at least need to make it move forward and backwards, and we would also like it to skid realistically and handle different surfaces too. Let's focus on getting all of this working well with one tire, then it will be easy to set up a car with four.
To test situations where the tire is subject to a variety of movements we can first pretend that this single tire itself is a car, and let the user rotate it directly. Here is a basic way of keeping track of which keys (w/a/s/d) the user is currently pressing:
1 2 3 4 5 6 7 8 9 10 11 12 13 14 15 16 17 18 19 20 21 22 23 24 25 26 27 28 29 30 31 32 33 | //global scope enum { TDC_LEFT = 0x1, TDC_RIGHT = 0x2, TDC_UP = 0x4, TDC_DOWN = 0x8 }; //testbed Test class variable int m_controlState; //testbed Test class constructor m_controlState = 0; //testbed Test class functions void Keyboard(unsigned char key) { switch (key) { case 'a' : m_controlState |= TDC_LEFT; break; case 'd' : m_controlState |= TDC_RIGHT; break; case 'w' : m_controlState |= TDC_UP; break; case 's' : m_controlState |= TDC_DOWN; break; default: Test::Keyboard(key); } } void KeyboardUp(unsigned char key) { switch (key) { case 'a' : m_controlState &= ~TDC_LEFT; break; case 'd' : m_controlState &= ~TDC_RIGHT; break; case 'w' : m_controlState &= ~TDC_UP; break; case 's' : m_controlState &= ~TDC_DOWN; break; default: Test::Keyboard(key); } } |
Now let's add a function to the tire class to do something clever with that input state:
1 2 3 4 5 6 7 8 9 10 11 12 13 14 15 16 17 18 19 20 21 22 23 24 25 26 27 28 29 | //tire class variables float m_maxForwardSpeed; // 100; float m_maxBackwardSpeed; // -20; float m_maxDriveForce; // 150; //tire class function void updateDrive(int controlState) { //find desired speed float desiredSpeed = 0; switch ( controlState & (TDC_UP|TDC_DOWN) ) { case TDC_UP: desiredSpeed = m_maxForwardSpeed; break; case TDC_DOWN: desiredSpeed = m_maxBackwardSpeed; break; default: return;//do nothing } //find current speed in forward direction b2Vec2 currentForwardNormal = m_body->GetWorldVector( b2Vec2(0,1) ); float currentSpeed = b2Dot( getForwardVelocity(), currentForwardNormal ); //apply necessary force float force = 0; if ( desiredSpeed > currentSpeed ) force = m_maxDriveForce; else if ( desiredSpeed < currentSpeed ) force = -m_maxDriveForce; else return; m_body->ApplyForce( force * currentForwardNormal, m_body->GetWorldCenter() ); } |
Now that the tire can move back and forwards, let's also make it turn by applying some torque when the a/d keys are pressed. Because our end-goal is to attach these tires to a car body, this part of the program will be dropped soon so it's just a crude way to get some turning happening so we can test the next part - skidding and surfaces. On the other hand if you were actually intending to model the car as a single body, you would want to refine this to be more sensible, eg. not letting the car turn unless it is moving etc.
1 2 3 4 5 6 7 8 9 | void updateTurn(int controlState) { float desiredTorque = 0; switch ( controlState & (TDC_LEFT|TDC_RIGHT) ) { case TDC_LEFT: desiredTorque = 15; break; case TDC_RIGHT: desiredTorque = -15; break; default: ;//nothing } m_body->ApplyTorque( desiredTorque ); } |
Allowing skidding
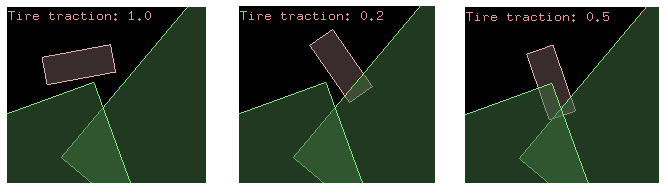
At this point we have a controllable body which behaves very well according to our original plan of killing the lateral velocity. This is all very well if you want to simulate slot-cars which stick to their track like glue, but it feels a bit more natural if the car can skid a bit. Unfortunately this is really really hard... haha just kidding. Actually we have already done it - remember how when we killed the lateral velocity we killed it completely, right? We simply calculated the necessary impulse and applied it, like a boss. That's not very realistic because it means the tire will never slip sideways. So all we need to do is restrict that impulse to some maximum value, and the tire will slip when the circumstances require a greater correction than allowable. This is only one extra statement in the updateFriction function:
1 2 3 4 5 | //in updateFriction, lateral velocity handling section b2Vec2 impulse = m_body->GetMass() * -getLateralVelocity(); //existing code if ( impulse.Length() > maxLateralImpulse ) impulse *= maxLateralImpulse / impulse.Length(); m_body->ApplyLinearImpulse( impulse, m_body->GetWorldCenter() ); //existing code |
Source code up to this point
Setting up varying surfaces (complex user data part 1)
To define certain areas of the scene as different surfaces we'll need to make some fixtures on the 'ground' body and use a contact listener to keep track of when the wheel is touching them. This is very similar to the jumpability topic where we use a sensor fixture attached to the bottom of the player to check what they are standing on. The only difference this time is that the fixture on the ground is a sensor (because we need to drive over it) and the player (car) is solid because we want it to crash into stuff.
So we could set a user data tag as a simple integer like in the 'jumpability' topic to mark certain fixtures as ground areas, and then whenever our contact listener gets a BeginContact/EndContact we can check that tag to see if the tire has entered/left the ground area. However, that kind of simple method only works when you can be absolutely sure that the user data set in the fixture is an integer tag. In a proper game you are likely to have many kinds of fixtures bumping into each other.
It would be nice to have more information than just a single integer in the user data, eg. as well as the surface friction type we might like to know if the car went off course or into the audience stands etc. We also would like to be able to change this info without needing Box2D's SetUserData function every time, for example if some aspect of the ground area was to change over time (eg. wet area gradually dries up).
There are various ways you could handle this. It's not really a whole lot to do with the topic at hand, but since I haven't covered it in detail anywhere else yet I will take this opportunity to show the way I often do it. I'm not sure if there is any typical or recommended method, but this usually works ok. We create a generic class to use for fixture data...
1 2 3 4 5 6 7 8 9 10 11 12 13 14 15 | //types of fixture user data enum fixtureUserDataType { FUD_CAR_TIRE, FUD_GROUND_AREA }; //a class to allow subclassing of different fixture user data class FixtureUserData { fixtureUserDataType m_type; protected: FixtureUserData(fixtureUserDataType type) : m_type(type) {} public: virtual fixtureUserDataType getType() { return m_type; } virtual ~FixtureUserData() {} }; |
1 2 3 4 5 6 7 8 9 10 11 12 13 14 15 16 17 | //class to allow marking a fixture as a car tire class CarTireFUD : public FixtureUserData { public: CarTireFUD() : FixtureUserData(FUD_CAR_TIRE) {} }; //class to allow marking a fixture as a ground area class GroundAreaFUD : public FixtureUserData { public: float frictionModifier; bool outOfCourse; GroundAreaFUD(float fm, bool ooc) : FixtureUserData(FUD_GROUND_AREA) { frictionModifier = fm; outOfCourse = ooc; } }; |
We will not be using the 'out of course' setting of the ground areas in this topic, I just added that to make it clear that now you can put a whole bunch of information in the fixture user data. Here is how you would set up a couple of static ground area fixtures and set their fixture user data with the class above:
1 2 3 4 5 6 7 8 9 10 11 12 13 14 15 | b2BodyDef bodyDef; m_groundBody = m_world->CreateBody( &bodyDef ); b2PolygonShape polygonShape; b2FixtureDef fixtureDef; fixtureDef.shape = &polygonShape; fixtureDef.isSensor = true; polygonShape.SetAsBox( 9, 7, b2Vec2(-10,15), 20*DEGTORAD ); b2Fixture* groundAreaFixture = groundBody->CreateFixture(&fixtureDef); groundAreaFixture->SetUserData( new GroundAreaFUD( 0.5f, false ) ); polygonShape.SetAsBox( 9, 5, b2Vec2(5,20), -40*DEGTORAD ); groundAreaFixture = groundBody->CreateFixture(&fixtureDef); groundAreaFixture->SetUserData( new GroundAreaFUD( 0.2f, false ) ); |
 You might have noticed that we have used 'new' to create the user data object but we didn't
keep a reference to it. Sure, Box2D has the reference but it will not take care of
deleting this object when we're done with it, which could cause a memory leak.
One way to take care of this is by being very careful when we destroy bodies and
fixtures, to get this pointer back from Box2D and delete it. That's kind of a
nuisance, especially for pointers that will almost always be deleted when the fixture
itself is destroyed.
You might have noticed that we have used 'new' to create the user data object but we didn't
keep a reference to it. Sure, Box2D has the reference but it will not take care of
deleting this object when we're done with it, which could cause a memory leak.
One way to take care of this is by being very careful when we destroy bodies and
fixtures, to get this pointer back from Box2D and delete it. That's kind of a
nuisance, especially for pointers that will almost always be deleted when the fixture
itself is destroyed.Fortunately Erin is a few steps ahead of us already. The Box2D world has a 'destruction listener' which we can use to make the engine call a function every time it destroys a fixture as a result of deleting the body that fixture belonged to. This is another thing I haven't covered in detail yet so let's take a look at it now. We need to make a subclass of the b2DestructionListener class, implement the SayGoodbye(b2Fixture*) function, and set an instance of this class in the world with SetDestructionListener:
1 2 3 4 5 6 7 8 9 10 11 12 13 14 15 16 17 18 | //global scope class MyDestructionListener : public b2DestructionListener { void SayGoodbye(b2Fixture* fixture) { if ( FixtureUserData* fud = (FixtureUserData*)fixture->GetUserData() ) delete fud; } //(unused, but we must implement all pure virtual functions) void SayGoodbye(b2Joint* joint) {} }; //testbed Test class variable MyDestructionListener m_destructionListener; //in testbed Test class constructor m_world->SetDestructionListener(&m_destructionListener); |
1 2 3 4 | ~iforce2d_TopdownCar() { m_world->DestroyBody( m_groundBody ); } |
Handling varying surfaces (complex user data part 2)
Now that we have fixtures set up with various kinds of user data, we'll need to handle these cases when things collide. This is another area where there is no official or best way to handle things, but I will continue with the way I often do it which works ok.
Contact listeners have been covered in other topics so I won't go into the details here. What we are trying to do is set up a function to handle each case of contact (begin/end) between the types of fixtures we have so that we can concentrate on the game logic, eg. in this scene we only have two types so one function will suffice:
1 2 | //testbed Test class, or global scope void tire_vs_groundArea(b2Fixture* tireFixture, b2Fixture* groundAreaFixture, bool began); |
Anyhow, to get this function called correctly is just a matter of checking the fixture user data in your contact listener's BeginContact/EndContact functions. In this topic we only care about when contacts begin/end so we can save repeating some code...
1 2 3 4 5 6 7 8 9 10 11 12 13 14 15 16 17 18 | void handleContact(b2Contact* contact, bool began) { b2Fixture* a = contact->GetFixtureA(); b2Fixture* b = contact->GetFixtureB(); FixtureUserData* fudA = (FixtureUserData*)a->GetUserData(); FixtureUserData* fudB = (FixtureUserData*)b->GetUserData(); if ( !fudA || !fudB ) return; if ( fudA->getType() == FUD_CAR_TIRE && fudB->getType() == FUD_GROUND_AREA ) tire_vs_groundArea(a, b, began); else if ( fudA->getType() == FUD_GROUND_AREA && fudB->getType() == FUD_CAR_TIRE ) tire_vs_groundArea(b, a, began); } void BeginContact(b2Contact* contact) { handleContact(contact, true); } void EndContact(b2Contact* contact) { handleContact(contact, false); } |
1 2 3 4 5 6 7 8 9 10 11 12 13 14 15 16 17 18 19 20 21 22 23 24 25 26 | //tire class variables std::set<GroundAreaFUD*> m_groundAreas; float m_currentTraction; //tire class constructor m_currentTraction = 1; //tire class functions void addGroundArea(GroundAreaFUD* ga) { m_groundAreas.insert(ga); updateTraction(); } void removeGroundArea(GroundAreaFUD* ga) { m_groundAreas.erase(ga); updateTraction(); } void updateTraction() { if ( m_groundAreas.empty() ) m_currentTraction = 1; else { //find area with highest traction m_currentTraction = 0; std::set<GroundAreaFUD*>::iterator it = m_groundAreas.begin(); while (it != m_groundAreas.end()) { GroundAreaFUD* ga = *it; if ( ga->frictionModifier > m_currentTraction ) m_currentTraction = ga->frictionModifier; ++it; } } } |
Almost there... now we just need to fill in the tire_vs_groundArea function with the logic to kick this off. The implementation of this is made more straightforward due to the fact that we know what type of fixtures we have been given and we can make some assumptions without needing to check everything:
1 2 3 4 5 6 7 8 9 | void tire_vs_groundArea(b2Fixture* tireFixture, b2Fixture* groundAreaFixture, bool began) { TDTire* tire = (TDTire*)tireFixture->GetBody()->GetUserData(); GroundAreaFUD* gaFud = (GroundAreaFUD*)groundAreaFixture->GetUserData(); if ( began ) tire->addGroundArea( gaFud ); else tire->removeGroundArea( gaFud ); } |
 To finish off, use the current traction variable of the tire class to modify the amount
of friction, drag and power applied in the updateFriction and updateDrive functions of the tire class. To keep
things simple I just multiplied each final value given to the force/impulse functions by
the traction variable. As long as we keep the traction variable between zero and one this
should make sense.
To finish off, use the current traction variable of the tire class to modify the amount
of friction, drag and power applied in the updateFriction and updateDrive functions of the tire class. To keep
things simple I just multiplied each final value given to the force/impulse functions by
the traction variable. As long as we keep the traction variable between zero and one this
should make sense.Source code up to this point
Putting it together
So we have a nice tire that can drive and slide around. Depending on what you're making, with a bit of tweaking this might be enough for some games, but I don't think it's what you really came here for... the fun really starts when we put four of these tires on a car body to act independently. Fortunately the hard parts have all been covered already, and all we need to do now is set up the body and direct the control input a bit differently.
Let's start with a car with four fixed wheels, then we can handle the steering after that. We'll need a class to represent a car:
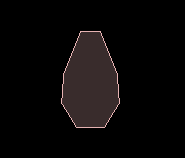
1 2 3 4 5 6 7 8 9 10 11 12 13 14 15 16 17 18 19 20 21 22 23 | class TDCar { b2Body* m_body; public: TDCar(b2World* world) { //create car body b2BodyDef bodyDef; bodyDef.type = b2_dynamicBody; m_body = world->CreateBody(&bodyDef); b2Vec2 vertices[8]; vertices[0].Set( 1.5, 0); vertices[1].Set( 3, 2.5); vertices[2].Set( 2.8, 5.5); vertices[3].Set( 1, 10); vertices[4].Set( -1, 10); vertices[5].Set(-2.8, 5.5); vertices[6].Set( -3, 2.5); vertices[7].Set(-1.5, 0); b2PolygonShape polygonShape; polygonShape.Set( vertices, 8 ); b2Fixture* fixture = m_body->CreateFixture(&polygonShape, 0.1f);//shape, density } }; |
 Next the tires are created and attached. Eventually we will want to
turn the front wheels so we should keep a reference to the front wheel joints.
For now we'll just keep all the joints fixed by setting the same value for lowerAngle
and upperAngle. The back wheels could also be weld joints.
Next the tires are created and attached. Eventually we will want to
turn the front wheels so we should keep a reference to the front wheel joints.
For now we'll just keep all the joints fixed by setting the same value for lowerAngle
and upperAngle. The back wheels could also be weld joints.
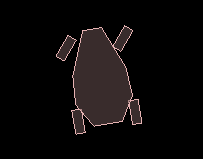
1 2 3 4 5 6 7 8 9 10 11 12 13 14 15 16 17 18 19 | //car class variables std::vector<TDTire*> m_tires; b2RevoluteJoint *flJoint, *frJoint; //car class constructor b2RevoluteJointDef jointDef; jointDef.bodyA = m_body; jointDef.enableLimit = true; jointDef.lowerAngle = 0;//with both these at zero... jointDef.upperAngle = 0;//...the joint will not move jointDef.localAnchorB.SetZero();//joint anchor in tire is always center TDTire* tire = new TDTire(world); jointDef.bodyB = tire->m_body; jointDef.localAnchorA.Set( -3, 8.5f ); flJoint = (b2RevoluteJoint*)world->CreateJoint( &jointDef ); m_tires.push_back(tire); // (...other tires are similar...) |
 Clearly, this fine machine is modeled on uh... a Ferrari. One of those old ones, you know.
No it doesn't look like a frog, I don't see any resemblance at all. Anyway, let's add a
function to take the input from the main loop and direct it to the wheels:
Clearly, this fine machine is modeled on uh... a Ferrari. One of those old ones, you know.
No it doesn't look like a frog, I don't see any resemblance at all. Anyway, let's add a
function to take the input from the main loop and direct it to the wheels:
1 2 3 4 5 6 7 | //car class function void update(int controlState) { for (int i = 0; i < m_tires.size(); i++) m_tires[i]->updateFriction(); for (int i = 0; i < m_tires.size(); i++) m_tires[i]->updateDrive(controlState); } |
1 2 3 | float maxForwardSpeed = 250; float maxBackwardSpeed = -40; float maxDriveForce = 300; |
1 2 3 4 5 6 7 8 9 10 11 12 13 14 15 16 | //car class function float lockAngle = 40 * DEGTORAD; float turnSpeedPerSec = 320 * DEGTORAD;//from lock to lock in 0.25 sec float turnPerTimeStep = turnSpeedPerSec / 60.0f; float desiredAngle = 0; switch ( controlState & (TDC_LEFT|TDC_RIGHT) ) { case TDC_LEFT: desiredAngle = lockAngle; break; case TDC_RIGHT: desiredAngle = -lockAngle; break; default: ;//nothing } float angleNow = flJoint->GetJointAngle(); float angleToTurn = desiredAngle - angleNow; angleToTurn = b2Clamp( angleToTurn, -turnPerTimeStep, turnPerTimeStep ); float newAngle = angleNow + angleToTurn; flJoint->SetLimits( newAngle, newAngle ); frJoint->SetLimits( newAngle, newAngle ); |
 Playing with this you'll find that it's great for doing huge 'drift' powerslides,
something you might like every now and then, but it's too drifty to feel like it's
on a tarmac road. I think this is due to the extra mass of the car body we added.
I found that to get something I was satisfied with I needed to give the front and
back wheels different characteristics, and even then it was not quite as much fun
as I had hoped. To do this properly would take quite a bit of tweaking and tuning,
probably involving different friction and power settings at different speeds,
but I'll leave that to you :)
Playing with this you'll find that it's great for doing huge 'drift' powerslides,
something you might like every now and then, but it's too drifty to feel like it's
on a tarmac road. I think this is due to the extra mass of the car body we added.
I found that to get something I was satisfied with I needed to give the front and
back wheels different characteristics, and even then it was not quite as much fun
as I had hoped. To do this properly would take quite a bit of tweaking and tuning,
probably involving different friction and power settings at different speeds,
but I'll leave that to you :)Conclusion
... are you still here? This topic ended up being much longer than I thought, and covered quite a few more things than just the 'killing' of lateral velocity on a body. To make this into an enjoyable foundation for a game would still require more work, but hopefully this is a good start. Check out the source code below to compile and edit this yourself, or just download a binary and play around with it :)
Source code
Here is the source code for those who would like to try it out for themselves. This is a 'test' for the testbed, based on Box2D v2.3.0.
Testbed test: iforce2d_TopdownCar.h
Linux binary
Windows binary
YouTube video
Here is the source code and json for the scene in the video:
iforce2d_TopdownCarRaceTrack.h
racetrack.json
Linux binary
Florian Knoll has made an implementation for libGDX: forum post