


Box2D C++ tutorials - Sticky projectiles
Last edited: July 14 2013
Halt! You should have a good understanding of
the basic tutorials before venturing further.
Projectiles that stick into things... or not
Ok, so you're having fun throwing things around in the Box2D world but you'd like them stick to something when they hit, rather than just fall to the ground. Common examples might be ninja stars and arrows.
 This topic will cover three main points:
- modeling an arrow in flight
- deciding whether the arrow should stick into something it hits
- attaching the arrow to the thing it hit
Deciding whether the arrow should stick in will be done by looking at the impulse that Box2D uses to separate it from the target, in the PostSolve function of the collision listener. This is a more generically useful point, not only for 'arrows sticking in' but if you consider this as a 'how much damage was done' question then it becomes useful in many more situations.
Once we've decided whether the arrow should stick in, we can attach it either with a weld joint or by actually making it part of the body that it hit, by destroying the original arrow and adding a new fixture to the target.
As with the other 'advanced' tutorials, I will not be showing full code here, only the important parts. Check out the source code at the bottom of the page to see the full implementation.
Arrow in flight
If you went to the moon and fired an arrow at a 45 degree angle, it would fly in a nice parabola and land on its tail at 45 degrees. Actually this is what bodies in Box2D do too, because there is no air friction simulated so everything is essentially in a vacuum. To make the arrow behave as expected we need to manually add some friction or 'drag' to make it rotate.
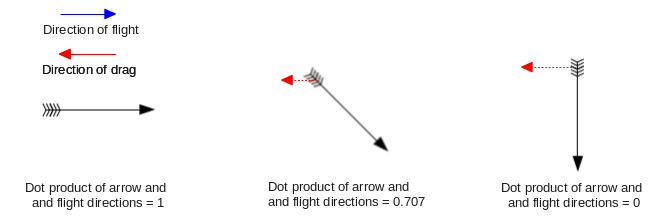
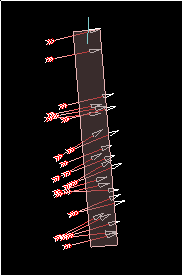
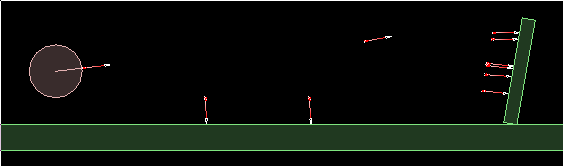
We can simulate drag as a small force, applied to the tail of the arrow in the opposite direction to its movement, and scaled according to how fast it is moving. In reality the whole arrow is subject to a small amount of resistance as it moves through the air but compared to the drag on the tail vanes this is so small we can ignore it. The size of the drag force depends on what angle the arrow is pointing, compared to its direction of flight. For our purposes we will say that the drag is zero when the arrow is exactly pointing in the flight direction, and at its maximum when the arrow is at 90 degrees to the flight direction. To find a good value for the maximum we will just try a number and adjust it until it looks ok :)
The values in between can be found by using the dot product of the arrow direction and the flight direction. Actually, I think 'one minus the dot product' is what we want:
 Update: Astute observers will point out that when the
arrow is facing backwards relative to the direction of movement, the value of 'one minus the dot product' will
be between 1 and 2, and the arrow will be flipped around more quickly than it should be.
Although this doesn't cause any major problems it's not really what was intended - the correct
way is to take the absolute value of the dot product.
Update: Astute observers will point out that when the
arrow is facing backwards relative to the direction of movement, the value of 'one minus the dot product' will
be between 1 and 2, and the arrow will be flipped around more quickly than it should be.
Although this doesn't cause any major problems it's not really what was intended - the correct
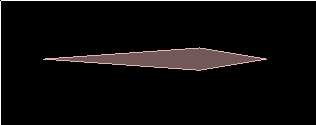
way is to take the absolute value of the dot product.The arrow can be any sensible shape, a long box would do fine but if you wanted to make the center of mass a little more real-world like, you could make a slightly non-symmetrical polygon like this:
1 2 3 4 5 6 7 | b2PolygonShape polygonShape; b2Vec2 vertices[4]; vertices[0].Set( -1.4f, 0 ); vertices[1].Set( 0, -0.1f ); vertices[2].Set( 0.6f, 0 ); vertices[3].Set( 0, 0.1f ); polygonShape.Set(vertices, 4); |
 With this setup, the direction the arrow is pointing is (1,0) in the local coordinates (body coordinates)
of the arrow, so to get this direction in world coordinates at any time, we can use
GetWorldVector( b2Vec2(1,0) ) and of course the direction of flight is just
GetLinearVelocity(). In my example above I have made the tail of the arrow at (-1.4,0) so this is where
I want to apply the drag force. The ApplyForce() function takes a position in world coordinates so I
would need to use GetWorldPoint( b2Vec2(-1.4,0) ) to get this. Putting it all together, we would have:
With this setup, the direction the arrow is pointing is (1,0) in the local coordinates (body coordinates)
of the arrow, so to get this direction in world coordinates at any time, we can use
GetWorldVector( b2Vec2(1,0) ) and of course the direction of flight is just
GetLinearVelocity(). In my example above I have made the tail of the arrow at (-1.4,0) so this is where
I want to apply the drag force. The ApplyForce() function takes a position in world coordinates so I
would need to use GetWorldPoint( b2Vec2(-1.4,0) ) to get this. Putting it all together, we would have:
1 2 3 4 5 6 7 8 9 | b2Vec2 pointingDirection = arrowBody->GetWorldVector( b2Vec2( 1, 0 ) ); b2Vec2 flightDirection = arrowBody->GetLinearVelocity(); float flightSpeed = flightDirection.Normalize();//normalizes and returns length float dot = b2Dot( flightDirection, pointingDirection ); float dragForceMagnitude = (1 - fabs(dot)) * flightSpeed * flightSpeed * dragConstant * arrowBody->GetMass(); b2Vec2 arrowTailPosition = arrowBody->GetWorldPoint( b2Vec2( -1.4, 0 ) ); arrowBody->ApplyForce( dragForceMagnitude * -flightDirection, arrowTailPosition ); |
The flight speed is squared because apparently drag increases proportionally to the square of the velocity. The mass of the object has also been taken into account, so that objects with the same aerodynamic characteristics behave the same even if they are different sizes (not sure if that is correct though...).
If you try this out, you will notice that although everything we've set is working, the arrow swings from side to side and never stabilizes in the direction of flight. This is simply because equal forces are able to act for every swing which is not realistic - in the real world a little energy is lost in this process, so we can set the arrow body to have some angular damping to fix this. With the arrow body above I found values of about 0.1 for drag constant and 3 for angular damping were a good point to start tweaking from.
1 2 | //when body is created arrowBody->SetAngularDamping( 3 ); |
 Hmm... you'll need quite a large area to play in for this one!
Deciding whether to stick
When the arrow hits something, there are two main ways we could decide whether it should stick into the thing it hit. One is simply to look at the velocity of the arrow and say that if it's over a given speed then it will stick into the target. The other way is to look at how much impulse is required to push the arrow back out of the target, in the PostSolve function.
We'll do the latter for this topic because we wouldn't really learn anything new if we just decided by checking the velocity. The PostSolve check method is also useful in many other situations where you want to know how hard two things impacted, even if they're not going to stick into each other.
Here's what the PostSolve function looks like. We can get the usual contact information as for BeginContact/EndContact, and there is an extra parameter containing info about the impulse that was calculated to separate the two bodies.
1 2 3 4 5 6 7 8 | void PostSolve(b2Contact* contact, const b2ContactImpulse* impulse); struct b2ContactImpulse { float32 normalImpulses[b2_maxManifoldPoints]; float32 tangentImpulses[b2_maxManifoldPoints]; int32 count; }; |
To make things a bit more interesting I'm going to make a few different types of target, with different levels of 'hardness' so that the arrows will require more speed to stick into the harder targets. I'll put this in the user data of the fixtures so it can be checked in the PostSolve function.
1 2 3 4 5 6 7 8 9 10 11 12 | //only one parameter but could add more as necessary struct TargetParameters { float hardness; }; //class variable TargetParameters m_strawTarget; //in constructor m_strawTarget.hardness = 1; ... myFixture->SetUserData( &m_strawTarget ); |
If you try this you'll find that SetActive cannot be called during the world time step, which is where PostSolve is called from, so we cannot directly call SetActive on the arrows inside PostSolve. In the next part of this topic we will need to attach the arrows to the target outside the time step anyway, so we might as well set up a structure to hold the necessary info (just a pointer to the two bodies that collided) and put these into a list so we can do the SetActive after the time step has completed:
1 2 3 4 5 6 7 8 9 10 11 12 13 14 15 16 17 18 19 20 21 22 23 24 25 26 27 28 29 30 31 32 33 34 35 36 37 38 39 40 | struct StickyInfo { b2Body* arrowBody; b2Body* targetBody; }; //class variable vector<StickyInfo> m_collisionsToMakeSticky; void PostSolve(b2Contact* contact, const b2ContactImpulse* impulse) { b2Fixture* fixtureA = contact->GetFixtureA(); b2Fixture* fixtureB = contact->GetFixtureB(); //fixture with user data is a target, other fixture is an arrow TargetParameters* targetInfoA = (TargetParameters*)fixtureA->GetUserData(); TargetParameters* targetInfoB = (TargetParameters*)fixtureB->GetUserData(); if ( targetInfoA && impulse->normalImpulses[0] > targetInfoA->hardness ) { StickyInfo si; si.targetBody = fixtureA->GetBody(); si.arrowBody = fixtureB->GetBody(); m_collisionsToMakeSticky.push_back(si); } else if ( targetInfoB && impulse->normalImpulses[0] > targetInfoB->hardness ) { StickyInfo si; si.targetBody = fixtureB->GetBody(); si.arrowBody = fixtureA->GetBody(); m_collisionsToMakeSticky.push_back(si); } } //in Step function, immediately after calling world step for (int i = 0; i < m_collisionsToMakeSticky.size(); i++) { StickyInfo& si = m_collisionsToMakeSticky[i]; si.arrowBody->SetActive(false); } m_collisionsToMakeSticky.clear(); |
Attaching the projectile to the target - weld joint method
Okay, so now we know which target body to attach the arrow to, it's just a matter of doing it. Let's go with the easiest way first, a weld joint. The weld joint is probably the simplest of the joints, all it does is stick hold two bodies in place relative to each other, exactly what we need for this situation.
1 2 3 4 5 6 7 8 9 10 11 12 13 14 15 16 17 18 | //in Step function, immediately after calling world step for (int i = 0; i < m_collisionsToMakeSticky.size(); i++) { StickyInfo& si = m_collisionsToMakeSticky[i]; //set the joint anchors at the arrow tip - should be good enough b2Vec2 worldCoordsAnchorPoint = si.arrowBody->GetWorldPoint( b2Vec2(0.6f, 0) ); b2WeldJointDef weldJointDef; weldJointDef.bodyA = si.targetBody; weldJointDef.bodyB = si.arrowBody; weldJointDef.localAnchorA = weldJointDef.bodyA->GetLocalPoint( worldCoordsAnchorPoint ); weldJointDef.localAnchorB = weldJointDef.bodyB->GetLocalPoint( worldCoordsAnchorPoint ); weldJointDef.referenceAngle = weldJointDef.bodyB->GetAngle() - weldJointDef.bodyA->GetAngle(); m_world->CreateJoint( &weldJointDef ); } m_collisionsToMakeSticky.clear(); |
Attaching the projectile to the target - create new fixture method
The other way you could attach the arrow to the target is by making it a fixture of the target, and destroying the arrow itself. Hmm... actually as I write this right now, I don't see a lot of benefit to this method over the weld joint method, but we'll take a look at it anyway.
The old body will be destroyed so that part's easy. Getting the positions right for the new fixture for the target body is a little more tricky. We can take the standard positions we use when creating an arrow, and transform them by the difference between the target and arrow body transforms. There are a whole bunch of handy functions in b2Math.h which can be used for things like this :)
1 2 3 4 5 6 7 8 9 10 11 12 13 14 15 16 17 18 19 20 21 22 23 | //start with standard positions as for normal arrow creation b2Vec2 vertices[4]; vertices[0].Set( -1.4f, 0 ); vertices[1].Set( 0, -0.1f ); vertices[2].Set( 0.6f, 0 ); vertices[3].Set( 0, 0.1f ); //now multiply by difference between arrow and target transforms b2Transform diffTransform = b2MulT( si.targetBody->GetTransform(), si.arrowBody->GetTransform() ); for (int i = 0; i < 4; i++) vertices[i] = b2Mul(diffTransform, vertices[i]); b2PolygonShape polygonShape; polygonShape.Set(vertices, 4); //create a new fixture in the target body b2FixtureDef fixtureDef; fixtureDef.shape = &polygonShape; fixtureDef.density = 1; si.targetBody->CreateFixture( &fixtureDef ); //discard the original arrow body m_world->DestroyBody( si.arrowBody ); |
This time the main difference is that now each arrow has become one with its target, so that it is part of the same rigid body.
 Depending on what you are doing, one of these methods will be better than the other. The weld joint
method would use slightly more CPU cycles to keep everything in position, but it
allows for the bodies to be detached later by simply destroying the joint between them. The
'create new fixture' method is slightly less costly so it might be better if you had a
huge amount of these stickies to deal with and they were never to be detached once they got
stuck in.
Depending on what you are doing, one of these methods will be better than the other. The weld joint
method would use slightly more CPU cycles to keep everything in position, but it
allows for the bodies to be detached later by simply destroying the joint between them. The
'create new fixture' method is slightly less costly so it might be better if you had a
huge amount of these stickies to deal with and they were never to be detached once they got
stuck in.And one final note - you may or may not like to make the projectile bodies 'bullet' bodies so that they don't tunnel through anything when moving fast. I found with the scene in this demo that the tunneling was not too bad at reasonable arrow speeds, and I preferred the way the arrows tended to stick in deeper without bullet body settings.
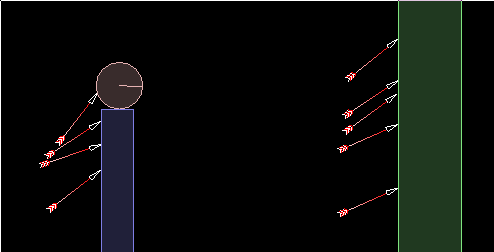
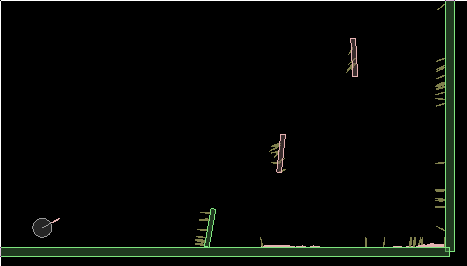
Update: speaking of sticking in deeper, in most cases you will notice that the arrows do not stick in very far at all with the method we've looked at here, because by the time PostSolve is called the collision response has already been calculated and applied, to bounce the arrow back out of the target. This can look a bit odd when the arrow hits the target at a shallow angle, because it gets deflected to an even more shallow angle and then sticks onto the target in a position where their edges are barely touching. See the first image at the top of this page for an example of this strangeness.
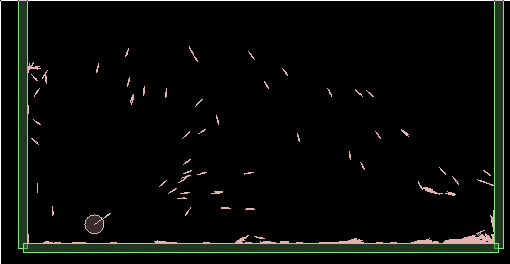
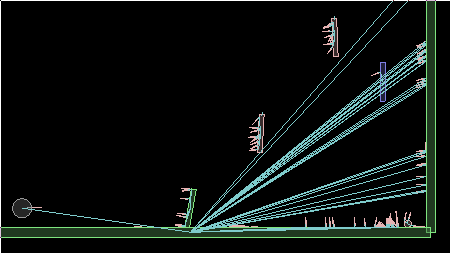
You could disable this collision reaction entirely by using PreSolve instead of PostSolve, and checking the speed at which the arrow hits the target. If the speed is high enough just do contact->SetEnabled(false) and the arrow will not be deflected at all. This should be fine if the speed of the arrow is not too high, but with fast moving projectiles it could look strange. Anyway, here is the result of the PreSolve method with some rather fast-moving arrows so you can see what I mean.
(Update: This method is implemented in the downloadable binary for the hovercar suspension topic.)
 The other drawback with this method is that no impact is transfered to the target, so it will not shudder or
swing naturally. Probably the best method is the PostSolve method, combined with some custom calculated
placement of the arrow in a final position which looks sensible.
The other drawback with this method is that no impact is transfered to the target, so it will not shudder or
swing naturally. Probably the best method is the PostSolve method, combined with some custom calculated
placement of the arrow in a final position which looks sensible.Source code
Here is the source code for those who would like to try it out for themselves. This is a 'test' for the testbed, based on Box2D v2.2.2.
See if you can hit the 'apple' on top of the moving target :)
Testbed test: iforce2d_StickyProjectiles.h
Linux binary
Windows binary
YouTube video