Created: July 20 2013
A few people have asked how the ground was rendered in Downhill Supreme. If you haven't seen the game, here is a video you can take a look at to see what we're talking about.
The ground is a 3d mesh, generated automatically from a single ground line. A very narrow field of view is used so that the mesh does not obscure the ground line which is the focus of the gameplay, yet still has some 3d depth to avoid having a perfectly flat appearance. After puzzling over various ways to make the ground, we eventually came up with this idea because it has quite a few advantages:
Starting with the original ground line (b2ChainShape) that the bike actually rides on, the normal at each vertex is extended downwards: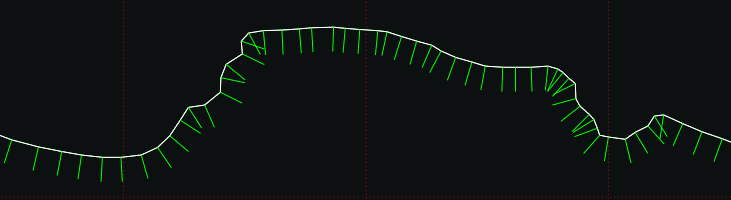 The ends of adjacent normals are connected to from a second line underneath the original. In some places this gives
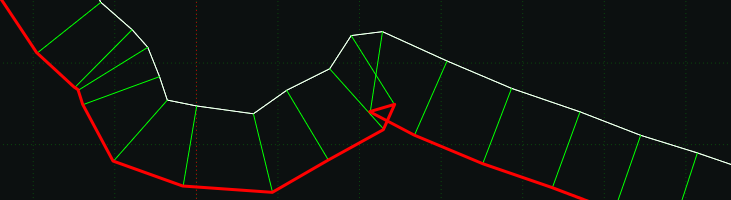
a line that crosses over itself:
The ends of adjacent normals are connected to from a second line underneath the original. In some places this gives
a line that crosses over itself:
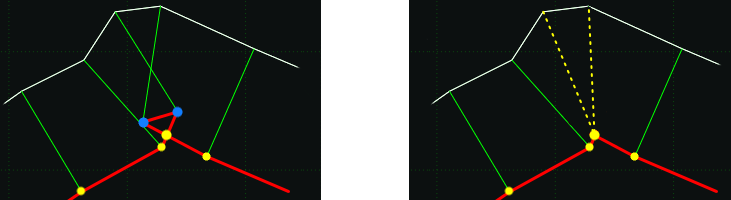
 The new line is checked for these self-intersections, and they are removed by ignoring any points between the
intersection (the blue points in the image below), and replacing them with the intersection point itself. All points from the original line that
were connected to ignored points, will now be connected to the new point.
The new line is checked for these self-intersections, and they are removed by ignoring any points between the
intersection (the blue points in the image below), and replacing them with the intersection point itself. All points from the original line that
were connected to ignored points, will now be connected to the new point.
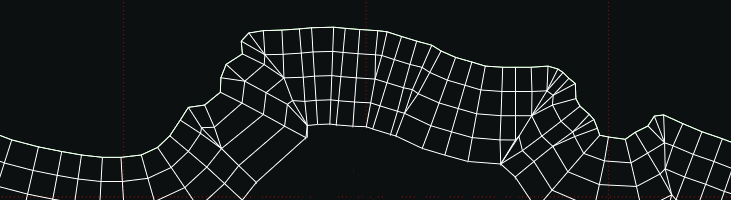
 It can take a few iterations of this to clean the new line properly. Some other cleaning is done too, like making
points that are very close together into a single point. More new lines are then added so that after a few iterations
you get something like this.
It can take a few iterations of this to clean the new line properly. Some other cleaning is done too, like making
points that are very close together into a single point. More new lines are then added so that after a few iterations
you get something like this.
 In Downhill Supreme, the distance to the new line is increased as each successive line is added (d = n^3) to make
it look like the ground curves toward being flat at the top:
In Downhill Supreme, the distance to the new line is increased as each successive line is added (d = n^3) to make
it look like the ground curves toward being flat at the top:
 The last line is then moved downward by a few hundred units to make sure it will always be offscreen even when the camera
zooms out a lot.
The last line is then moved downward by a few hundred units to make sure it will always be offscreen even when the camera
zooms out a lot.
 So far this is all entirely 2d. To make a 3d mesh, the points in each line are given gradually increasing z values,
related to their distance from the original ground line. This is also based on n^3, so that if you look at the mesh from
the side, you would see something like this:
So far this is all entirely 2d. To make a 3d mesh, the points in each line are given gradually increasing z values,
related to their distance from the original ground line. This is also based on n^3, so that if you look at the mesh from
the side, you would see something like this:
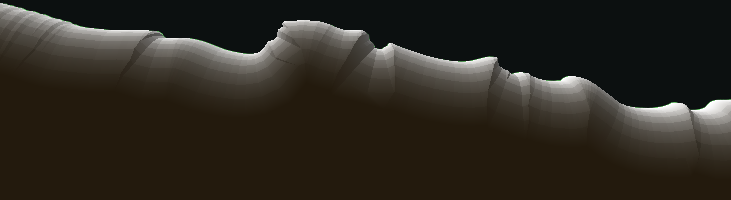
 Now that the mesh is 3d, the color for each polygon is calculated by taking the dot product of the polygon normal with
a constant directional 'sun' vector:
Now that the mesh is 3d, the color for each polygon is calculated by taking the dot product of the polygon normal with
a constant directional 'sun' vector:
 The brightness is also scaled down linearly giving the last two lines in the mesh a fixed brightness of 0.2 so
that no features are distinguishable, and the ground fades into a block of solid color:
The brightness is also scaled down linearly giving the last two lines in the mesh a fixed brightness of 0.2 so
that no features are distinguishable, and the ground fades into a block of solid color:
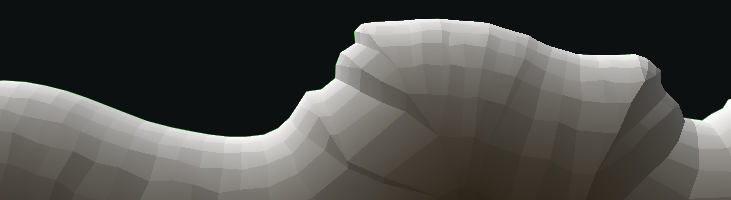
 The mesh is given some random jitter by moving each point a little (except for the original line of course) to take
away some of the sterile look, especially in smooth sections of the track as on the left here:
The mesh is given some random jitter by moving each point a little (except for the original line of course) to take
away some of the sterile look, especially in smooth sections of the track as on the left here:
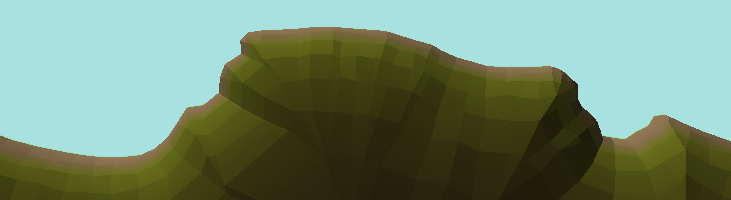
 Color is calculated based on colored points placed around the scene. Each polygon takes its color from the closest
of the colored points to itself. Another color setting for the topmost layer is applied across the whole track, to
give the effect of a dirt track on grass, etc:
Color is calculated based on colored points placed around the scene. Each polygon takes its color from the closest
of the colored points to itself. Another color setting for the topmost layer is applied across the whole track, to
give the effect of a dirt track on grass, etc:
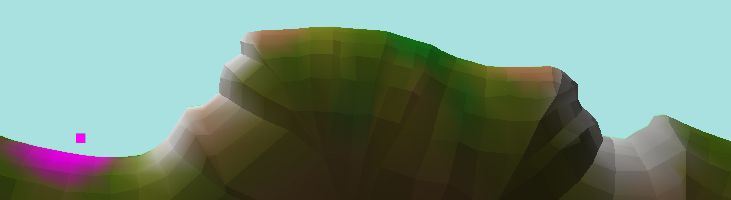
 It turned out that with the number of tracks made, placing individual color points around all of them was too
time-consuming. But here is an illustration of how they can be used to splat color onto the mesh. The purple point
is just to illustrate how vertex color is taken from the closest color point. There are dozens of other color
points under the ground which are not visible here but work in exactly the same way:
It turned out that with the number of tracks made, placing individual color points around all of them was too
time-consuming. But here is an illustration of how they can be used to splat color onto the mesh. The purple point
is just to illustrate how vertex color is taken from the closest color point. There are dozens of other color
points under the ground which are not visible here but work in exactly the same way:
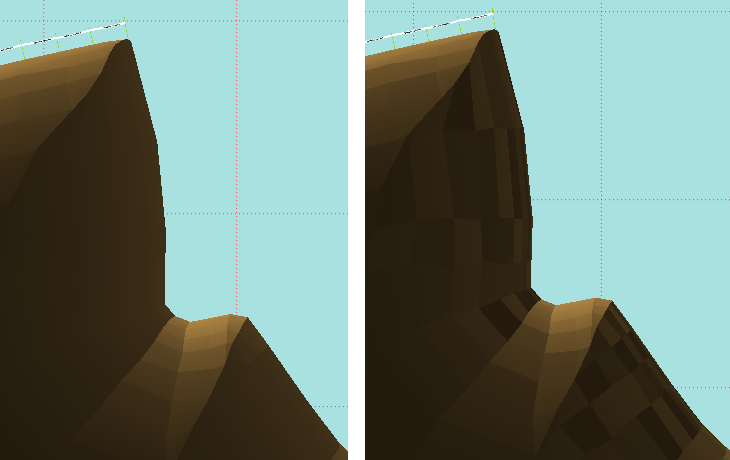
 After lighting calculation, the final color is randomized a little more, because otherwise polygons facing away from the
sun are all the same color giving a very bland look and loss of texture:
After lighting calculation, the final color is randomized a little more, because otherwise polygons facing away from the
sun are all the same color giving a very bland look and loss of texture:
 Once all this is ready, the vertex and color data is written to file as so that it can be
quickly loaded into arrays ready for glColorPointer and glVertexPointer. Because the final colors have already been
calculated, the game can render this mesh with no lighting or texturing for a better framerate. The mesh is also broken
up horizontally into sections of a size such that only 2-3 sections are onscreen at any given time, and only those
chunks of the mesh are rendered. This means that there are rarely more than about 2000 vertices being drawn, and helps
to keep the framerate at 60fps even on 3G devices.
Once all this is ready, the vertex and color data is written to file as so that it can be
quickly loaded into arrays ready for glColorPointer and glVertexPointer. Because the final colors have already been
calculated, the game can render this mesh with no lighting or texturing for a better framerate. The mesh is also broken
up horizontally into sections of a size such that only 2-3 sections are onscreen at any given time, and only those
chunks of the mesh are rendered. This means that there are rarely more than about 2000 vertices being drawn, and helps
to keep the framerate at 60fps even on 3G devices.
Rendering solid ground
A few people have asked how the ground was rendered in Downhill Supreme. If you haven't seen the game, here is a video you can take a look at to see what we're talking about.
The ground is a 3d mesh, generated automatically from a single ground line. A very narrow field of view is used so that the mesh does not obscure the ground line which is the focus of the gameplay, yet still has some 3d depth to avoid having a perfectly flat appearance. After puzzling over various ways to make the ground, we eventually came up with this idea because it has quite a few advantages:
- fully automatic, only a single line necessary
- concavity is not a problem
- large vertical ranges are not a problem
- pre-baked lighting for fast rendering
- custom color can be used for specific areas
- easily divisible into chunks to reduce overdraw
- looks good!
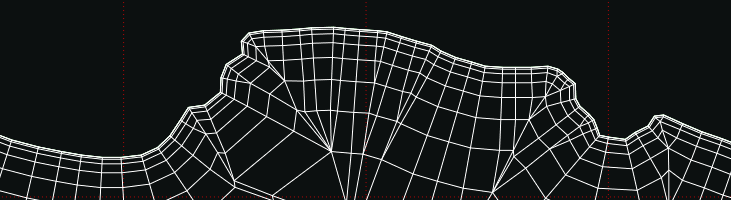
Starting with the original ground line (b2ChainShape) that the bike actually rides on, the normal at each vertex is extended downwards:
The ends of adjacent normals are connected to from a second line underneath the original. In some places this gives
a line that crosses over itself:
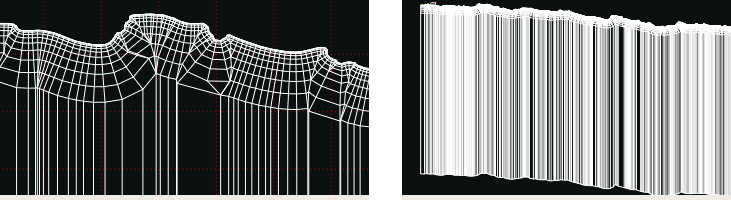
The new line is checked for these self-intersections, and they are removed by ignoring any points between the
intersection (the blue points in the image below), and replacing them with the intersection point itself. All points from the original line that
were connected to ignored points, will now be connected to the new point.
It can take a few iterations of this to clean the new line properly. Some other cleaning is done too, like making
points that are very close together into a single point. More new lines are then added so that after a few iterations
you get something like this.
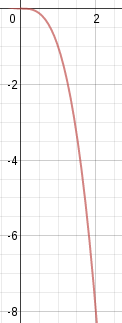
In Downhill Supreme, the distance to the new line is increased as each successive line is added (d = n^3) to make
it look like the ground curves toward being flat at the top:
The last line is then moved downward by a few hundred units to make sure it will always be offscreen even when the camera
zooms out a lot.
So far this is all entirely 2d. To make a 3d mesh, the points in each line are given gradually increasing z values,
related to their distance from the original ground line. This is also based on n^3, so that if you look at the mesh from
the side, you would see something like this:
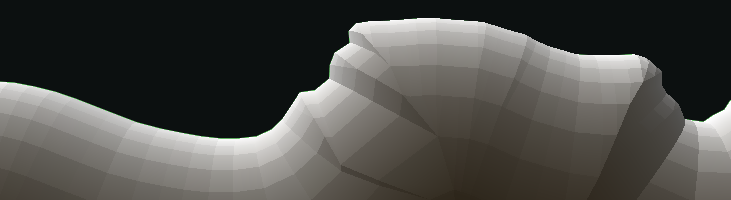
Now that the mesh is 3d, the color for each polygon is calculated by taking the dot product of the polygon normal with
a constant directional 'sun' vector:
The brightness is also scaled down linearly giving the last two lines in the mesh a fixed brightness of 0.2 so
that no features are distinguishable, and the ground fades into a block of solid color:
The mesh is given some random jitter by moving each point a little (except for the original line of course) to take
away some of the sterile look, especially in smooth sections of the track as on the left here:
Color is calculated based on colored points placed around the scene. Each polygon takes its color from the closest
of the colored points to itself. Another color setting for the topmost layer is applied across the whole track, to
give the effect of a dirt track on grass, etc:
It turned out that with the number of tracks made, placing individual color points around all of them was too
time-consuming. But here is an illustration of how they can be used to splat color onto the mesh. The purple point
is just to illustrate how vertex color is taken from the closest color point. There are dozens of other color
points under the ground which are not visible here but work in exactly the same way:
After lighting calculation, the final color is randomized a little more, because otherwise polygons facing away from the
sun are all the same color giving a very bland look and loss of texture:
Once all this is ready, the vertex and color data is written to file as so that it can be
quickly loaded into arrays ready for glColorPointer and glVertexPointer. Because the final colors have already been
calculated, the game can render this mesh with no lighting or texturing for a better framerate. The mesh is also broken
up horizontally into sections of a size such that only 2-3 sections are onscreen at any given time, and only those
chunks of the mesh are rendered. This means that there are rarely more than about 2000 vertices being drawn, and helps
to keep the framerate at 60fps even on 3G devices.