

Box2D C++ tutorials - Conveyor belts
Last edited: July 14 2013Conveyor belts

Halt! You should have a good understanding of
the basic tutorials before venturing further.
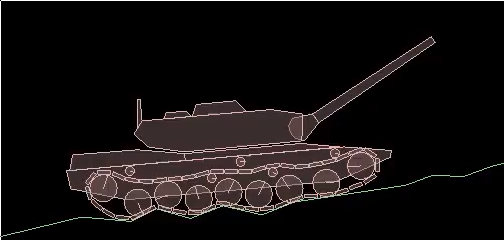
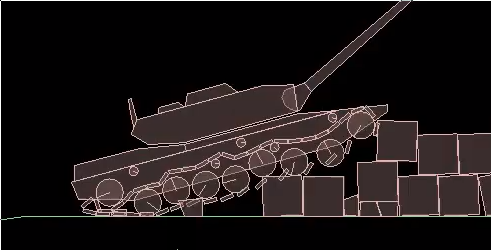
Conveyor belts are a neat thing to have in a game, and Box2D makes them work pretty well. You can construct a linked chain of rectangular segments, and wrap it around some wheels to function as a belt or even tank tracks. The belt could be moved by turning the wheels or applying a force to the belt itself. Even with a complex structure like this Box2D does a commendable job of holding it all together and is very efficient at it too. If you are running the simulation on a regular PC the computations involved will be absolutely nothing to worry about, and even on low end hardware like mobile phones the performance is still quite acceptable.
But this topic is not about those kinds of conveyor belts. Belts like this can be constructed from regular revolute joints which although certainly not being trivial, is not really advanced either. This page will cover a method for getting a conveyor belt like effect without constructing a fully modeled belt from individual segments, by specifying a fake velocity between contacting fixtures.
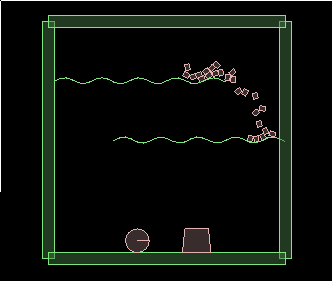
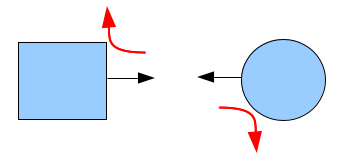
The main advantage of this method is a much more robust belt which is almost impossible to break, unlike the fully modeled belts which can quite easily pull apart under stressful situations as shown below. Other advantages are that construction of the belt becomes a lot simpler, and less CPU is needed to calculate the physics.
How it works
When two objects contact each other, the friction between them tries to stop their surfaces from moving relative to each other. Or to put it another way, if the objects are moving at different speeds, the friction will try to make the part of them that touches move at the same speed.
When Box2D calculates how two bodies should react in a situation like this, it must first calculate the relative velocity between the points that contacted. If we can butt in at that point and override the value it calculated, we can add a fake 'surface velocity' between the two bodies to pretend they are moving relative to each other, even if they're not. I believe this was first pointed out by the venerable mayobutter of WCK fame. If you want to see this running right now in your browser you can take a look at the flash demo on the WCK page and click through to the "Conveyor belts / One sided platforms" scene.
So this topic will cover the details of using that method and a convenient means to control it. This can be done inside the PreSolve callback by specifying a fake velocity every time step, similar to the manner in which you can disable a contact with SetEnabled().
Check out this YouTube video to see the result.
The drawback is that this feature is not part of the standard Box2D library.
Update: Originally the first part of this topic described some changes that could be made to the Box2D source code to achieve a conveyor belt effect. These are no longer necessary as Box2D v2.3.0 has these features already. If you are using an older version of Box2D and you would like to add this behavior without updating the whole library, you may be interested in that first part of the original topic - click here if you are.
We will need to edit
a few files in the Box2D source code itself, so if the sight of physics library blood
squirting out makes you queasy, maybe this isn't for you. Everyone else, follow me!
We'll discuss adding a function to b2Contact to allow changing of the surface velocity. This will be all that's needed in the Box2D API source code but as we'll see it is still kinda tricky to define exactly when and how this should be used, so the second part of the topic will show one possible way to do that.
Note: this topic uses Box2D v2.2
Our final goal is to add a SetTangentSpeed(float32) function to the b2Contact class. This is a pretty small addition but since this class stores some attributes and is passed around to other places, this small change needs to be made in a handful of places.
First up, in b2Contact.h add a class member variable, function declaration and implementation to the b2Contact class:
Next in b2Contact.cpp this value will need to be initialized in the constructor, and cleared
before each update:
In b2ContactSolver.h the b2ContactVelocityConstraint class will also need to hold this value too:
And finally in b2ContactSolver.cpp, the value is actually applied to modify the true surface velocity:
Check the source code files below if anything is unclear.
That's all we need to allow us to change the relative surface velocity of a contact from the PreSolve event.
Using this effectively is still another matter :)
We'll discuss adding a function to b2Contact to allow changing of the surface velocity. This will be all that's needed in the Box2D API source code but as we'll see it is still kinda tricky to define exactly when and how this should be used, so the second part of the topic will show one possible way to do that.
Changes to Box2D code
Note: this topic uses Box2D v2.2
Our final goal is to add a SetTangentSpeed(float32) function to the b2Contact class. This is a pretty small addition but since this class stores some attributes and is passed around to other places, this small change needs to be made in a handful of places.
First up, in b2Contact.h add a class member variable, function declaration and implementation to the b2Contact class:
1 2 3 4 5 6 7 8 9 10 11 12 13 | // storage for fake surface velocity, for one time step only float32 m_surfaceVelocityModifier; /// Modify the relative velocity of the two fixtures, perpendicular /// to the contact normal. This can be used inside the pre-solve /// contact listener. The modifier is only effective for the current /// time step (or sub-step in continuous collisions). void SetTangentSpeed(float32 Velocity); inline void b2Contact::SetTangentSpeed(float32 surfaceVelocityModifier) { m_surfaceVelocityModifier = surfaceVelocityModifier; } |
1 2 3 4 5 | //in constructor m_surfaceVelocityModifier = 0; //at beginning of b2Contact::Update() m_surfaceVelocityModifier = 0; |
1 2 | //b2ContactVelocityConstraint class member float32 surfaceVelocityModifier; |
1 2 3 4 5 6 7 8 | //in b2ContactSolver constructor, inside first loop where contact velocity properties are copied in vc->normalMass.SetZero(); // <- existing code vc->surfaceVelocityModifier = contact->m_surfaceVelocityModifier; // <- added code //in b2ContactSolver::SolveVelocityConstraints // Relative velocity at contact b2Vec2 dv = vB + b2Cross(wB, ccp->rB) - vA - b2Cross(wA, ccp->rA); // <- existing code dv -= vc->surfaceVelocityModifier * tangent; // <- added code |
Using this effectively
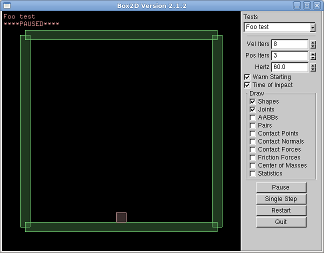
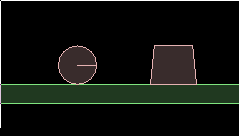
First let's see what this can do in the most basic case. Set up a scene to play around in, like the good old 'fenced in area' from the basic tutorials, with a typical box body in it:
 Set up a contact listener and put something like this into the PreSolve function:
1 2 3 4 | void PreSolve(b2Contact* contact, const b2Manifold* oldManifold) { contact->SetTangentSpeed( 5 ); } |
 Notice if you throw the box along the ground this surface velocity modifier does not completely control
the speed of movement because we did not replace the relative velocity, we only added/subtracted from it.
The surfaces are also still subject to friction so you can still simulate a belt or a patch of ground
with lower grip.
Notice if you throw the box along the ground this surface velocity modifier does not completely control
the speed of movement because we did not replace the relative velocity, we only added/subtracted from it.
The surfaces are also still subject to friction so you can still simulate a belt or a patch of ground
with lower grip.Another thing you'll notice is that the entire surface of the fixture is now a 'moving surface'. This is fine if you are simulating a wheel or a conveyor belt where the belt goes all the way around, but it would be nice if we could have more control, right? I think the ideal situation is where you can have a single fixture, but specify only some parts of it as a moving surface.
A more cunning plan
What we have so far is a nifty idea, but it's not really complete without a logical way to control it. I came up with a method that would probably work for many usages of this feature so I'll explain that now. Note this is by no means the only way you could arrange things, it's just the first one I tried out.
We are aiming to specify regions on the surface of each fixture, and relate these regions to a given surface velocity. Furthermore, we want to be able to turn the surface velocity on/off and regulate the speed while the simulation is running.
Here is a structure that holds that basic information:
1 2 3 4 5 | struct conveyorSegment { float minAngle; float maxAngle; float surfaceVelocity; }; |
This is what the angles mean:
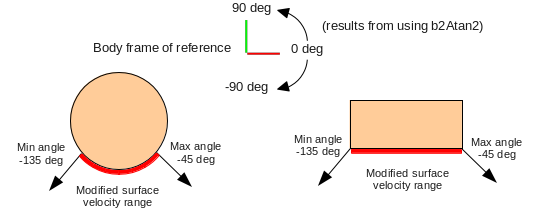 The angles are given in body coordinates so that the region will move around when the body moves around,
and will be compared with values obtained from atan2, so that's why they look a bit odd. They are also
approximate due to the way the manifold is calculated. Also note that the corners on the polygon
are irrelevant, it's not the corners that matter it's the surface normal direction (which happens to be at the
corners for the angles we've chosen).
The ranges in the image above are good ones to use as examples for controllable things which touch the ground
, so let's make two example fixtures and apply these ranges to them.
The angles are given in body coordinates so that the region will move around when the body moves around,
and will be compared with values obtained from atan2, so that's why they look a bit odd. They are also
approximate due to the way the manifold is calculated. Also note that the corners on the polygon
are irrelevant, it's not the corners that matter it's the surface normal direction (which happens to be at the
corners for the angles we've chosen).
The ranges in the image above are good ones to use as examples for controllable things which touch the ground
, so let's make two example fixtures and apply these ranges to them.We will store a reference to the 'conveyor segment' structure in the user data of fixtures so we can access it in PreSolve, and also alter it from the main program code easily. The sample code below has a circle and a polygon shape fixture, just create whatever you want here. You might want to make a polygon with one side longer or something so you can tell which edge has the moving surface. I will leave out the regular Box2D body creation code since you know that well by now...
1 2 3 4 5 6 | //define moving surface segment for each fixture when setting up world conveyorSegment* segment = new conveyorSegment; segment->minAngle = -135 * DEGTORAD; segment->maxAngle = -45 * DEGTORAD; segment->surfaceVelocity = 5; fixture->SetUserData(segment); |
 With a more sophisticated arrangement you could have multiple regions on one fixture with
different surface velocities. Since we put this into the fixture's user data, this can then
be accessed in the PreSolve event to provide a slightly more intelligent surface velocity
setting for individual contacts:
With a more sophisticated arrangement you could have multiple regions on one fixture with
different surface velocities. Since we put this into the fixture's user data, this can then
be accessed in the PreSolve event to provide a slightly more intelligent surface velocity
setting for individual contacts:
1 2 3 4 5 6 7 8 9 10 11 12 13 14 15 16 17 18 19 20 21 22 23 24 25 26 | void PreSolve(b2Contact* contact, const b2Manifold* oldManifold) { b2Fixture* fixtureA = contact->GetFixtureA(); b2Fixture* fixtureB = contact->GetFixtureB(); //check each fixture to see if surface velocity should be applied b2WorldManifold worldManifold; contact->GetWorldManifold( &worldManifold ); float surfaceVelocityModifier = 0; if ( ConveyorSegment* segment = (ConveyorSegment*)fixtureA->GetUserData() ) { b2Vec2 localNormal = fixtureA->GetBody()->GetLocalVector( worldManifold.normal ); float angle = b2Atan2( localNormal.y, localNormal.x ); if ( segment->minAngle < angle && angle < segment->maxAngle ) surfaceVelocityModifier += segment->surfaceVelocity; } if ( ConveyorSegment* segment = (ConveyorSegment*)fixtureB->GetUserData() ) { b2Vec2 localNormal = fixtureB->GetBody()->GetLocalVector( -worldManifold.normal ); float angle = b2Atan2( localNormal.y, localNormal.x ); if ( segment->minAngle < angle && angle < segment->maxAngle ) surfaceVelocityModifier += segment->surfaceVelocity; } contact->SetTangentSpeed( surfaceVelocityModifier ); } |
From there, it's pretty trivial to add keyboard control to the surface velocity at run-time. Keep a reference to the conveyorSegment pointers you created, and in the keyboard function just change the velocity as you wish. This has been covered in one of the basic tutorials so you can check it out there, or take a look at the full source code for this test in the link below.
The code just uses the keyboard to change the direction of the two 'conveyor segments' individually. The main difference is that since I am using Box2D v2.2 here the testbed allows a KeyboardUp to make things more pleasant to control. This is just a bare-bones implementation which ignores the fact that more than one key can be down at the same time :)
1 2 3 4 5 6 7 8 9 10 11 12 13 14 15 16 17 18 19 | void Keyboard(unsigned char key) { switch (key) { case 'q': m_circleConveyor->surfaceVelocity = -5; break; case 'e': m_circleConveyor->surfaceVelocity = 5; break; case 'a': m_polygonConveyor->surfaceVelocity = -5; break; case 'd': m_polygonConveyor->surfaceVelocity = 5; break; default: Test::Keyboard(key); } } void KeyboardUp(unsigned char key) { switch (key) { case 'q': case 'e': m_circleConveyor->surfaceVelocity = 0; break; case 'a': case 'd': m_polygonConveyor->surfaceVelocity = 0; break; default: Test::Keyboard(key); } } |
Other considerations
If you want to use this method to control movable player characters, you will likely want to set the bodies involved to be fixed rotation bodies. If you are using it to control the wheels of a vehicle, you will need to make sure that the wheels cannot rotate in relation to the vehicle body - yeah, it seems strange to say that huh? But otherwise, the wheels will mostly just rotate on their own and the vehicle will go nowhere.
Actually with vehicle wheels you might discover a drawback with this method - because there is no energy (torque) required to turn anything in the normal manner, the relative velocity can go from zero to full speed instantly. To get a more realistic situation you would have to increase the surface velocity gradually. Another problem is that if the wheel is fixed in relation to the vehicle chassis all the time, it cannot free-roll! But I guess if the wheel was held fixed by a revolute joint motor, there should be a way to cunningly control things so that when power was not being applied the joint motor would be disabled, to get a free roll.
By the way, if you have a platform game character who can only move left or right when touching the ground, this method takes care of checking when the player is on the ground (for the purposes of movement at least - it doesn't help with the 'Can I jump?' question).
For belts and wheels the fixtures are not really moving, which brings up the question of how to render this. I think in most cases it could be faked by just drawing the wheel rotating at the same speed as the surface velocity, or draw something appropriate to make the belt look like it's moving correctly.
Update: An example with explanation on YouTube
The surface velocity we used here is constant within the range we set, but you could also modify it depending on where the contact was so that the speed smoothly changed along the surface - not sure what that could be useful for, just saying.
Bonus
The b2Contact that is passed to the PreSolve callback has other settings that could possibly be controlled in a similar manner to the above method to get varying friction and restitution on different parts of a single fixture:
- void SetFriction(float32 friction);
- void SetRestitution(float32 restitution);
Source code
Anyway, here is the source code for those who would like to try it out for themselves. This is a 'test' for the testbed. To follow everything exactly as laid out in this topic you will need Box2D v2.2 and make the changes to the library as shown above yourself.
Testbed test: iforce2d_Conveyors.h
Linux binary
Windows binary
After originally starting this talk about conveyor belts I thought it would be strange to have just a circle and a polygon in the scene, so I added a couple of 'belts' made with chain shapes. You can also turn the polygon upside-down to act as a small conveyor belt that you can control with the keyboard.
YouTube video